")


The issue described on this page only affects Windows systems that originally installed I2P with version 0.9.5. Other operating systems are not affected.
This issue has been corrected as of the 0.9.5-win1 release.
Background
A change was introduced during the 0.9.5 cycle to allow I2P's configuration files to be edited with the standard
Windows text editor, Notepad. This change had the unfortunate side-effect of causing our I2P Site migration code to
fail to run on Windows systems, leading to I2P Sites being served from the installation directory. Consequently:
- depending upon how I2P is started, the I2P Site may not be accessible; and
- confusion ensues—all documentation states that I2P Sites are served from the profile path; and
- the update to Jetty 7, included in the 0.9.6 release, will fail.
While no action is required for users that are not hosting an I2P Site (or are not using the included Jetty to host an I2P Site), it is recommended to follow this procedure to avoid issues in case you decide to run a Jetty-hosted I2P Site in the future. If you are running an I2P Site it is important to follow this procedure prior to upgrading to 0.9.6.
Tickets 919 & 920 correspond to this issue.
Fixing the configuration
Because this issue causes the migration code to not run, the path in %APPDATA%\I2P\clients.config isn't
updated to use an absolute path for the Jetty config file, requiring the path to be set manually. Experienced users
can set the correct path in clients.config directly and restart I2P, but this page will explain how to
correct the problem from within the router console.
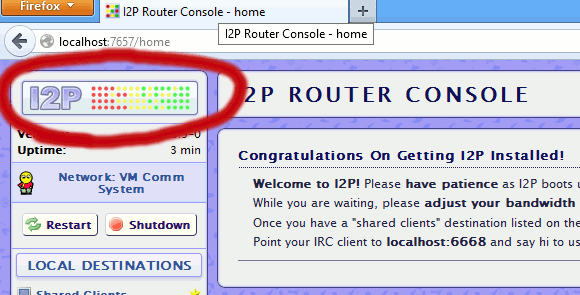
- From the Home page of the I2P Router Console, click the I2P logo in the upper-left corner.
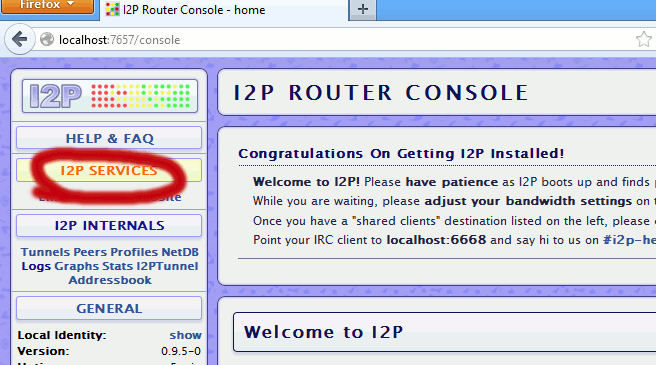
- Click the I2P Services link.
 You should see something like the following:
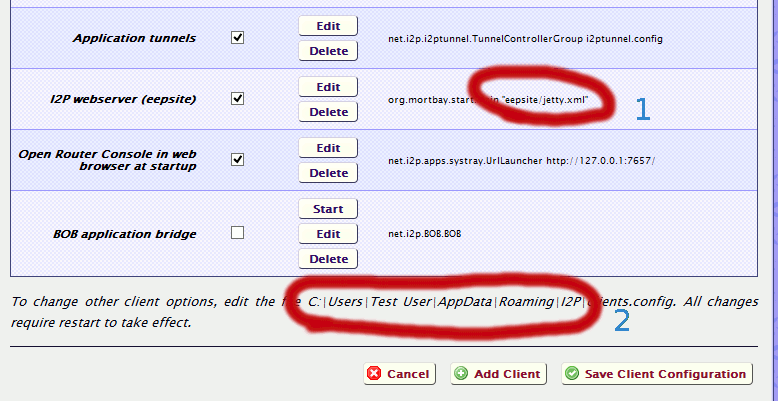 If the path at number 1 in the image above is set to
 I2P Site/jetty.xml, the path needs to be updated. - Click the
Editbutton next to I2P webserver (I2P Site). The page will reload to allow the path to be edited as shown below: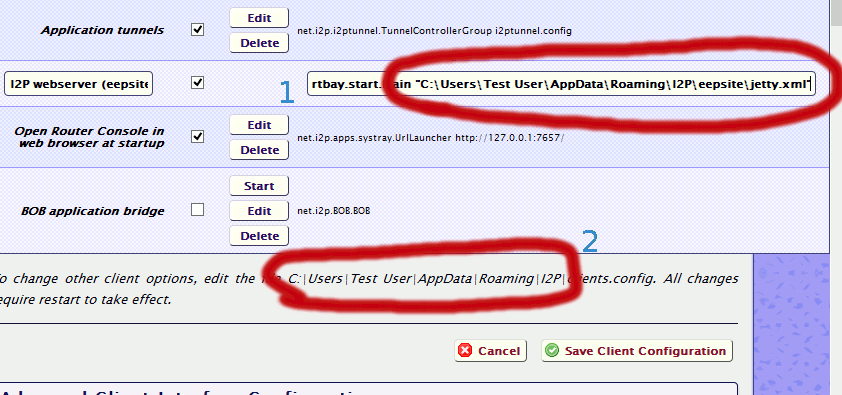 Insert the full path to your I2P configuration directory before the text "I2P Site/jetty.xml" as shown above,
then click Click the
Insert the full path to your I2P configuration directory before the text "I2P Site/jetty.xml" as shown above,
then click Click the Save Client Configurationbutton. - If you're hosting an I2P Site, move its contents to its proper home at
%APPDATA%\I2P\I2P Site\docroot. - At this point you should restart your I2P router.
After following the steps outlined above, your I2P Site will be served from %APPDATA%\I2P\I2P Site\docroot
and should be accessible at http://127.0.0.1:7658.